Dec 22, 2024
30-Day Visa for Oman: A Step-by-Step Guide
ARTICLE

Oman is known for its beautiful landscapes, rich culture, and hospitality. This is why the Middle Eastern country has become a must-visit destination for travelers in recent years. If you are also planning a trip to Oman and intend to stay for up to 30 days in the Sultanate of Oman, you will need the country’s 30-day visa. However, most people are unaware of how to apply for Oman's visa.
In this guide, we will walk you through the complete process of applying for a 30-day visa for Oman. This article will also include details about all the documents you will need to apply and the fee for a 30-day visa. Let’s begin!
Who Needs a 30-Day Visa for Oman?
First of all, we need to see who needs a 30-day visa for Oman. As per the Sultanate’s current visa policy, most foreign nationals require a visa to enter Oman. However, citizens of the Gulf Cooperation Council (GCC) countries are eligible for visa-free entry to Oman. These countries include:
Kingdom of Bahrain
State of Kuwait
State of Qatar
Kingdom of Saudi Arabia
United Arab Emirates
Those applying for a visa must know that the processing is done by the Royal Oman Police (ROP), therefore you should always check the official website for any information regarding your visa application.
Types of 30-Day Visa for Oman
The Sultanate of Oman has several visa options for a 30-day stay in the country. The following are the main types of 30-day visas for Oman:
Tourist Visa: For travelers who want to explore Oman’s attractions.
Business Visa: For professionals visiting Oman for meetings, conferences, or other business purposes.
Family Visit Visa: For individuals who are visiting their family members residing in the Sultanate.
Step-by-Step 30-Day Visa Application Process for Oman
The following is the step-by-step process of how you can apply for a 30-day visa for Oman:
Step 1: Determine Your Eligibility
First of all, check whether your nationality requires a 30-day visa to visit Oman and if you are eligible for eVisa services. Oman’s eVisa system is available for citizens of most countries, which means you won’t have to submit any physical application before traveling to the Gulf country. If you are not sure, you can visit the official ROP website or contact Oman’s embassy or consulate in your country to confirm.
Step 2: Gather the Required Documents
Before you start the application process, it is important to make sure that you have the following documents ready:
A valid passport valid for at least six months from the date of entry and at least 90 days after the end of your stay in Oman. Your passport must also contain at least two blank pages.
A passport-size photograph.
Proof of travel with a confirmed return ticket to your home country or your next destination.
Proof of accommodation in Oman. This may include a hotel booking or an invitation letter from a resident of the Sultanate.
A bank statement as proof of sufficient funds for the duration of your stay.
Travel health insurance documentation.
If you are applying for a family visit visa, you may also need to submit additional documents, such as proof of relationship with your host in Oman.
Step 3: Visit the POR’s eVisa Portal
Now, go to the Sultanate’s official eVisa portal at https://evisa.rop.gov.om/. It is important to always use the POR’s official website to ensure the security of your personal information and the authenticity of the 30-day visa process.
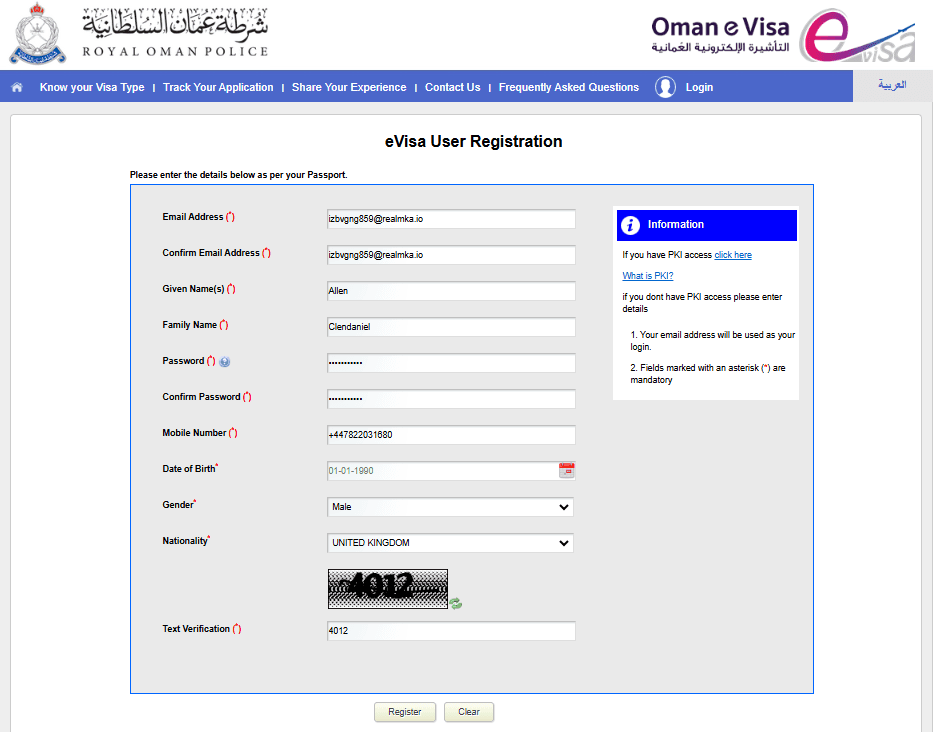
Step 4: eVisa User Registration
The next step is to initiate your eVisa user registration by going to https://evisa.rop.gov.om/apply-for-a-visa. You will need to put in the following details for registration:
Email Address
Confirm Email Address
Given Name(s)
Family Name
Password
Confirm Password
Mobile Number
Date of Birth
Gender
Nationality
Make sure all the information you enter in the User Registration form is as per your Passport. After entering all the details, click on “Register”.
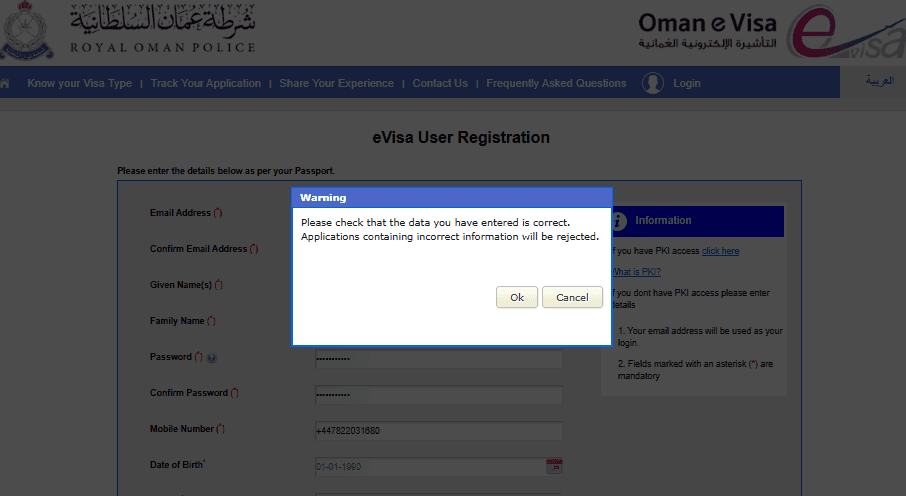
After clicking on the “Register” button, a pop-up will appear, asking you to recheck all your data to avoid any inconvenience later. If the information you have entered is correct, click “Ok”, otherwise click on “Cancel” and correct your data.
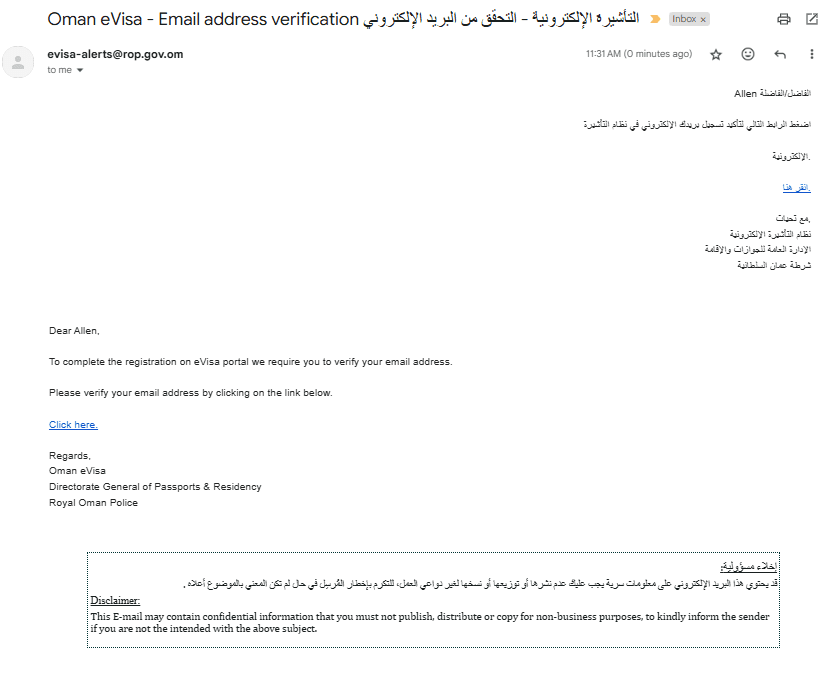
Once you click on the “Ok” button a new screen will appear telling you that a verification email has been sent to your email address.
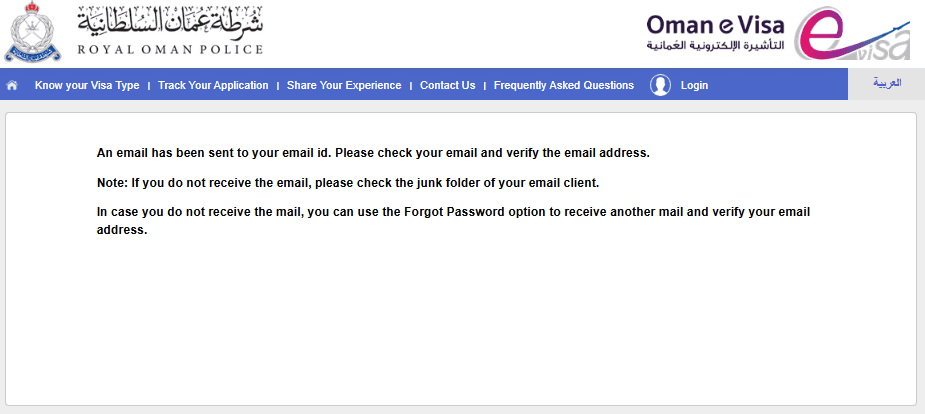
The next step is to go to your email inbox and verify the email address by clicking on the link sent by the evisa-alerts@rop.gov.om.
Step 5: Apply for a 30-day Visa
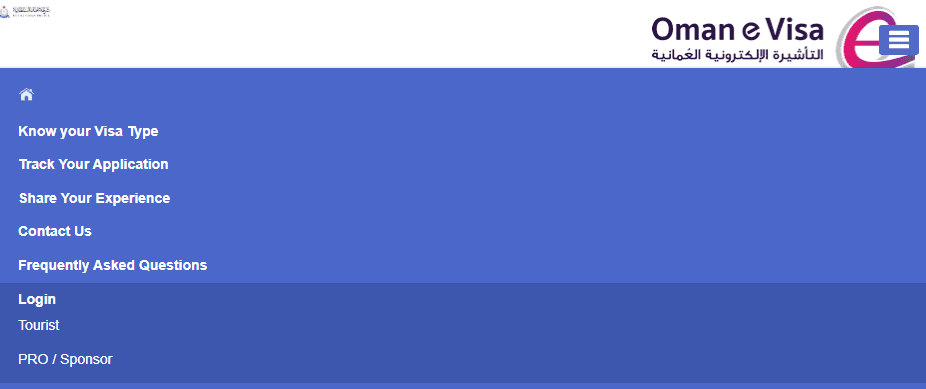
After clicking on the email confirmation link, the next step is to go to the navigation menu, take the cursor to the “Login” tab, and click on “Tourist” if you are applying as a tourist.
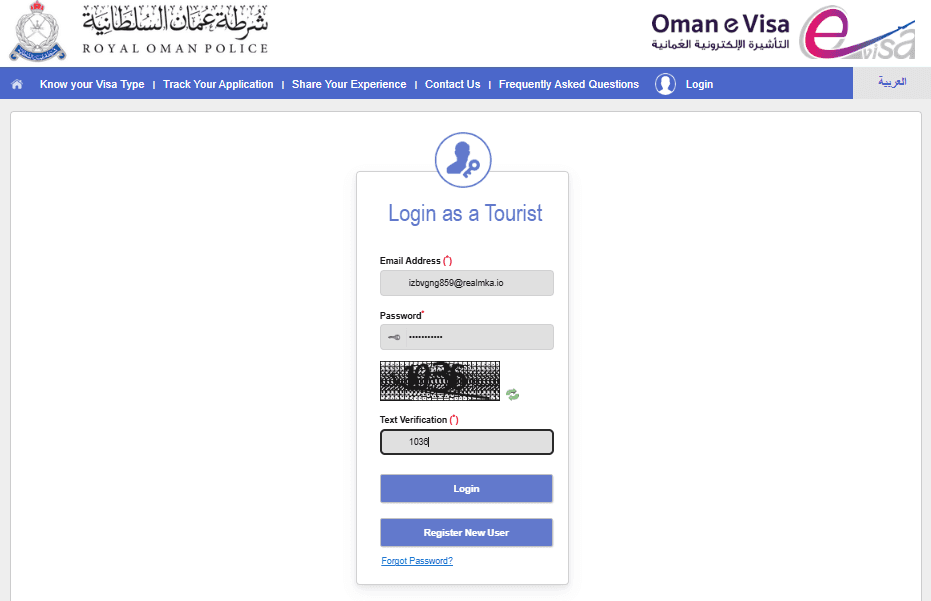
Now, put in your login details which will include your registered email and the password you entered while filling out the registration form.
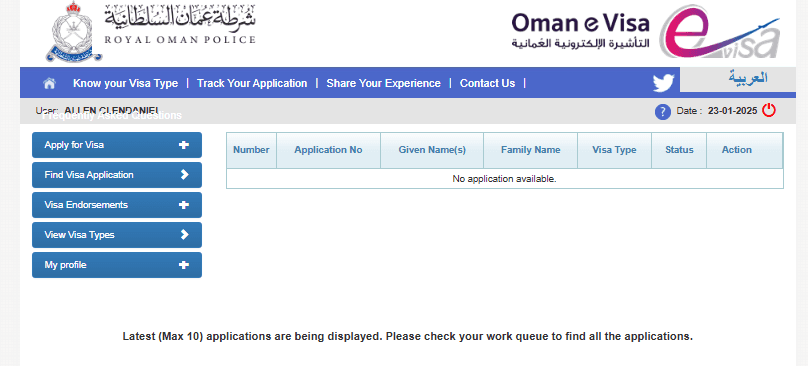
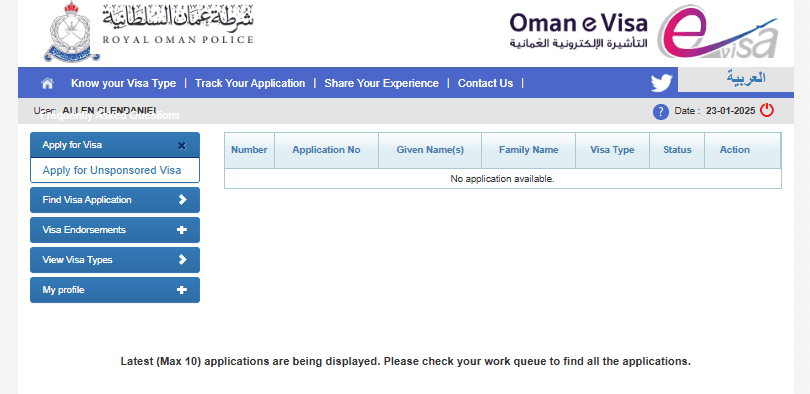
After you click on the “Login” button, the portal will take you to a new screen where you can:
Apply for a new visa
Find your previous visa applications
Check Visa endorsements
View visa types
See your profile
Click on the “Apply for Visa” tab. The dropdown menu will show “Apply for Unsponsored Visa”. Click on that button since you are applying as a tourist.
Once you click on the “Apply for Unsponsored Visa” the portal will redirect you to a “Visa Eligibility Wizard - Unsponsored Visas” screen where you have to select nationality and confirm whether or not you are a resident of GCC countries.
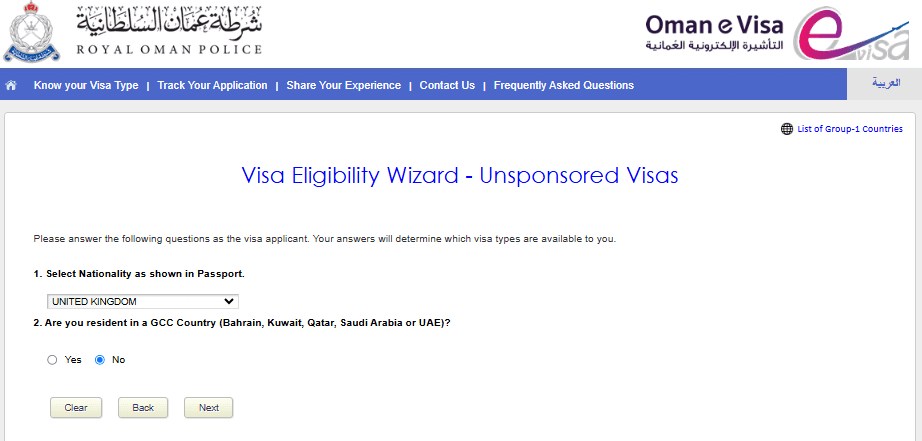
Once you select your nationality, and click on the “Next" button, you will be taken to a new screen that shows all the visa types you might be eligible for. The table will include the following sections:
Visa Name
Visa Fee
Length of Stay
Description
How to Apply

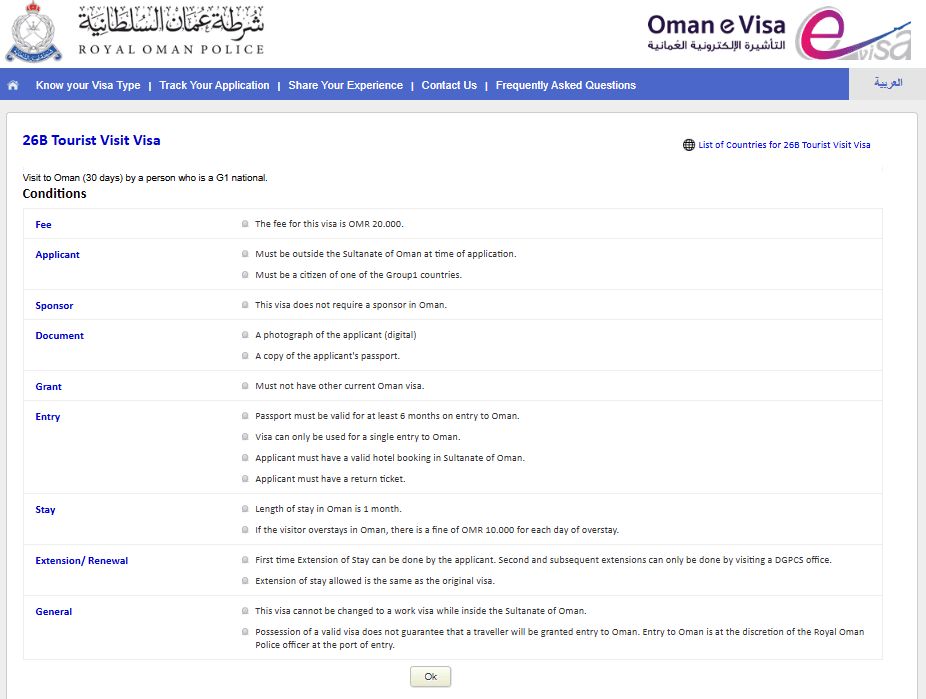
Let’s suppose you want to apply for a 26B Tourist Visit Visa which is a 30-day visa, first of all, check the full conditions of the visa so you know exactly what you will need to apply. To check visa conditions, click on the link in the “Description” column.
You will be directed to the page with visa conditions that will include the following:
Fee Information
Applicant Requirements
Sponsor Criteria (if applicable)
Document Requirements
Eligibility Criteria
Requirements for Entry into Oman
Requirements of Stay in Oman
Extension / Renewal Policy
General Conditions
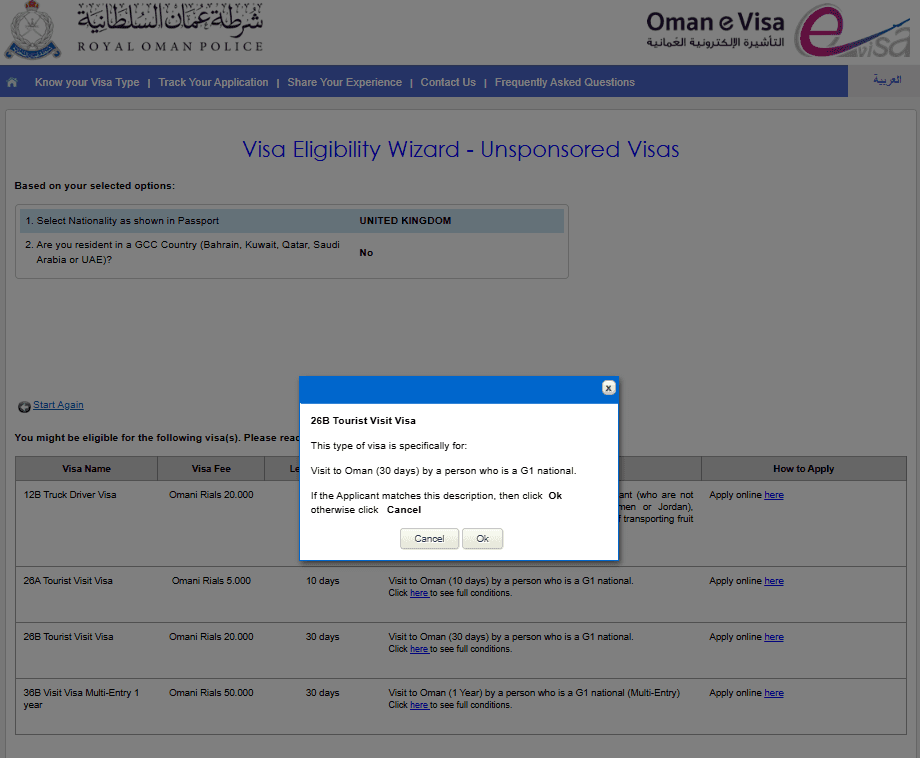
After checking the conditions of the visa, click on the “Ok” button and it will take you back to the previous page. Now, click on the link in the “How to Apply” column to start your application. A pop-up window will appear to confirm if you fulfill all the conditions and want to proceed with your visa application. Click on “Ok”.
In the next window, you will need to fill out all your “Travel Document Details” and “Applicant Details” in the online visa application form. The Travel Document Details will include the following:
Nationality
Document of Nationality
Travel Document Number
Travel Document Type
Issue Date
Expiry Date
Place of Issue
As for the Applicant Details, you will need to enter the following information:
Given Name(s)
Family Name
Gender
Date of Birth
Country of Birth
Place of Birth
Holder of Other Nationalities
Visa applying country
Last destination
Applicant Email
Applicant phone number
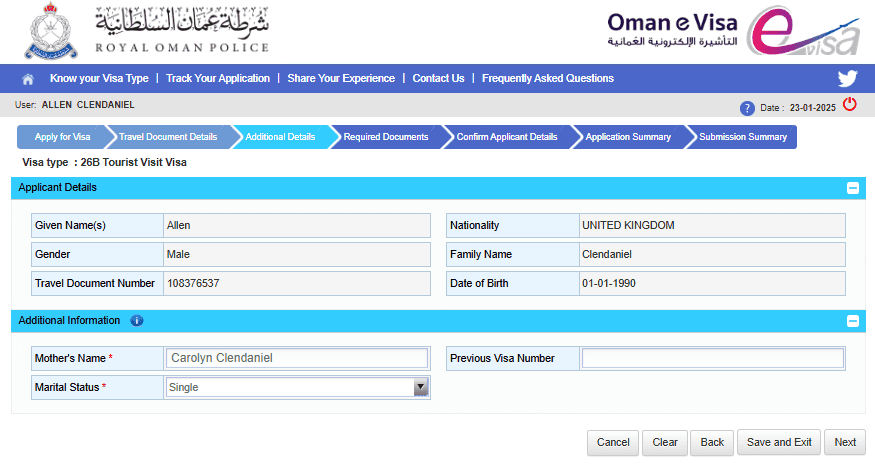
Fill out all the required information and click “Next”.

The tab that opens next will ask you for any additional information, such as the mother’s name and marital status, that the authorities may require. Enter the information and click on “Next”.
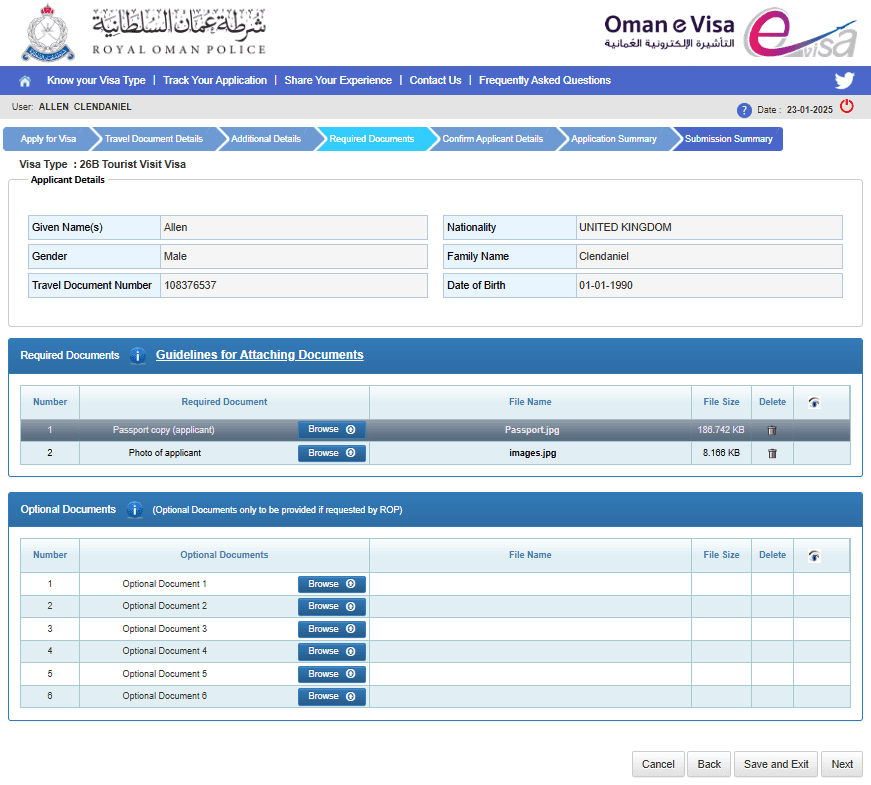
In the next section, you will need to provide documents for your 30-day visa application. Some documents, such as the passport copy and photo of the applicant, are mandatory to upload. Whereas, you will see a section to upload optional documents as well in case Oman’s POR requires any. Upload a clear copy of your passport and your picture and click “Next”.
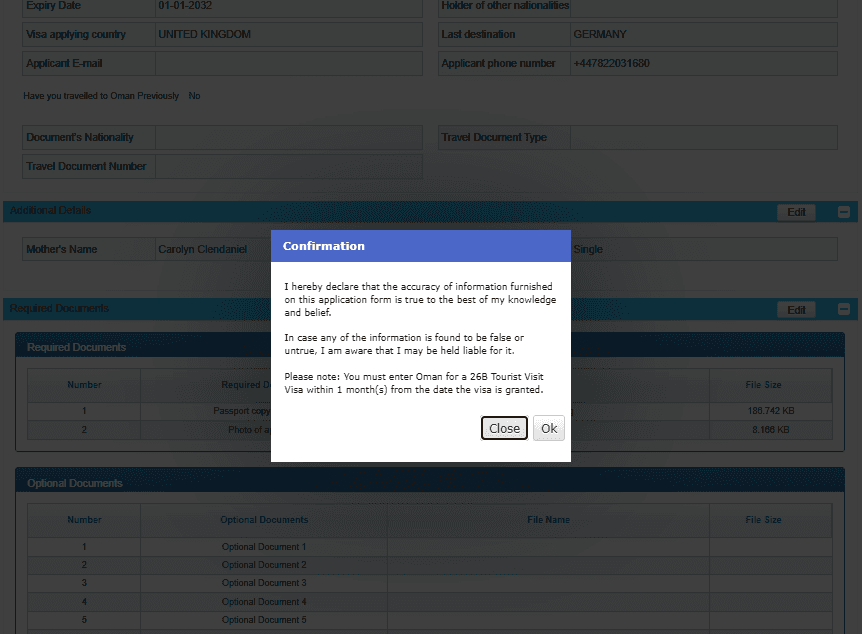
Once you upload and submit the documents, the eVisa portal will ask you to confirm your details before submitting your 30-day visa application. Go through all the details carefully, and if the information showing on the screen is correct, click “Submit”.

A pop-up window will appear asking to confirm the accuracy of the information you have provided. Click on the “Ok” button.
After clicking “Ok”, you will be redirected to the homepage. In case Oman’s ROP requires any additional information, you will be notified via email.
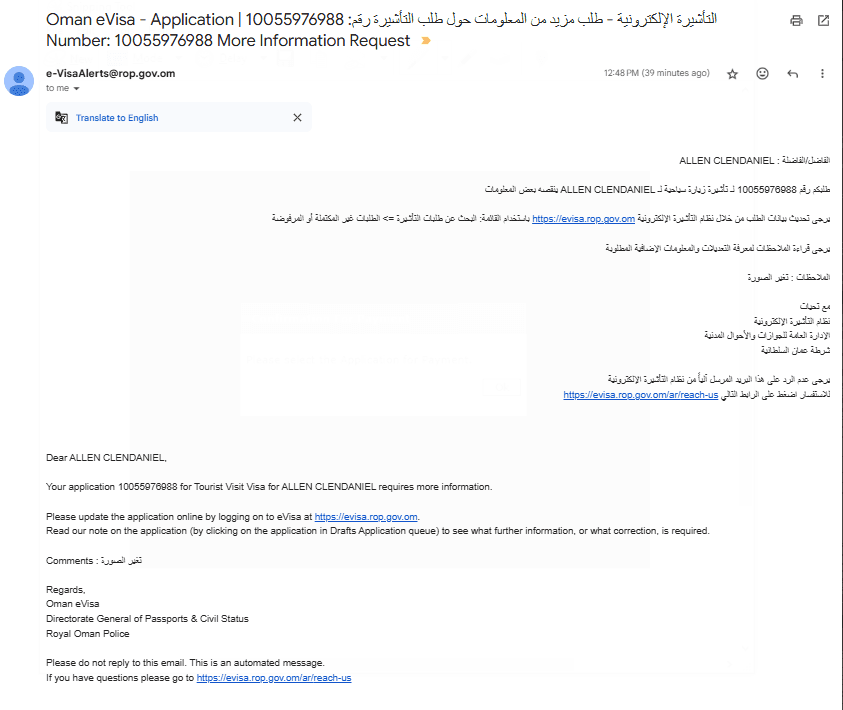
You will also see the status of your application as “Returned” on the homepage of the eVisa portal.
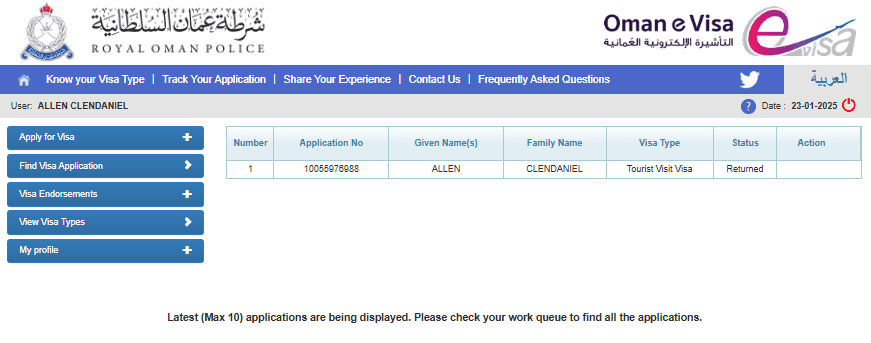
To resubmit your application by providing additional details, click on the “Find Visa Application” tab which will take you to a new page where you can take different actions regarding your visa application. Select your visa application and click on “Proceed”.
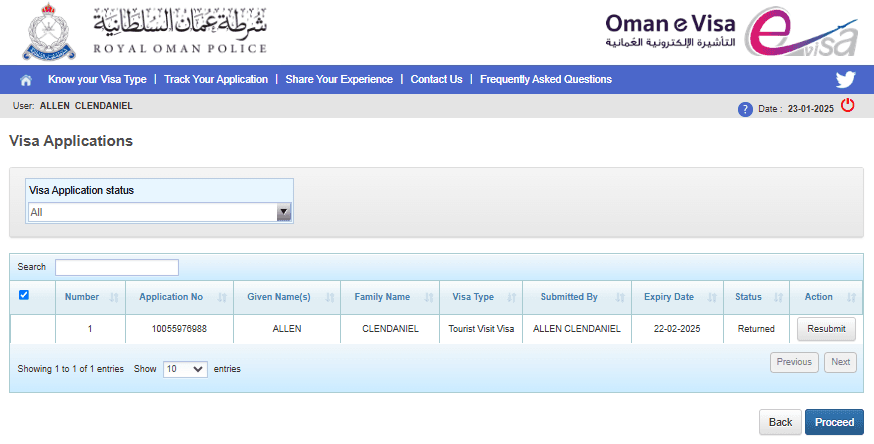
Now, enter the additional information in your application and resubmit it.
Step 6: Making Payment
Once you resubmit your application, you will receive an email from the Directorate General of Passports & Civil Status asking you to make the payment within 30 days.

Now, make the payment for your 30-day visa and wait for the Oman’s Royal Police to grant you the visa which normally takes 1 to 3 working days.
Step 7: Visa Approval
Once the application is approved, you will receive another email from the Directorate General of Passports & Civil Status.
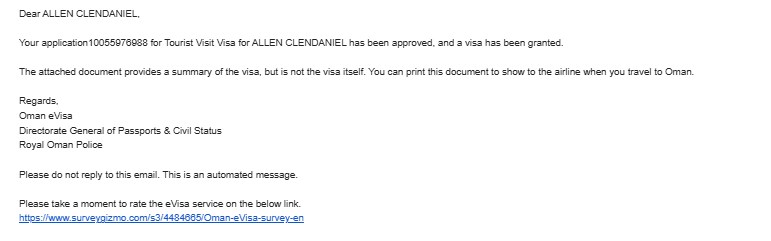
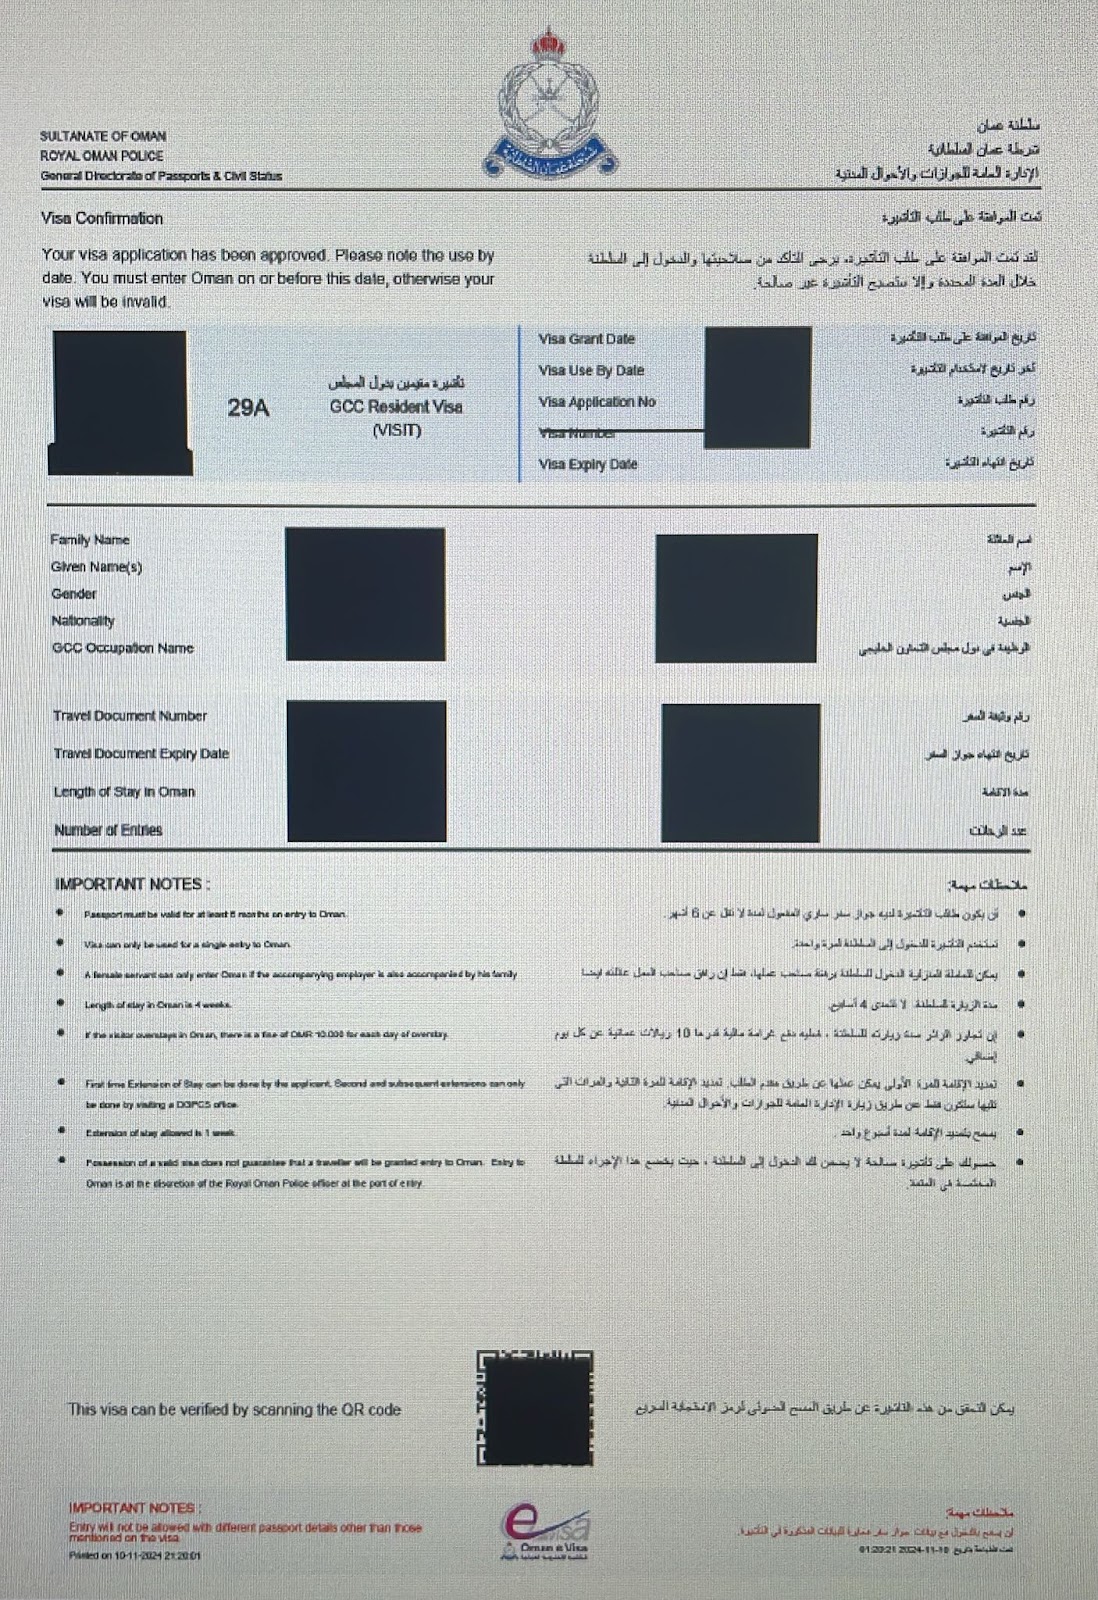
Once the visa is granted you either get it in your email or can download it from the ROP’s website from the Visa Endorsements section.
Conclusion
Applying for a 30-day visa for the Sultanate of Oman is quite an easy process if you follow the steps given above. Once you have your visa in hand, all you will need will be to pack for an unforgettable trip to the Gulf country!